
With mobile becoming more and more prevalent in the browsing of websites, it is no longer a good user experience expecting them to zoom into your pagination to load more blog post results. Today I hope to help you overcome this by showing you in this article how to add a load more button to the divi blog module in only 5 steps.
In this article, I hope to cover;
Table of contents
Let's get cracking.
Step 1 - Add a Blog Module
If you already have a blog module setup, feel free to jump to Step 2.
If you are just starting out, then let's add the Blog Module to our page.
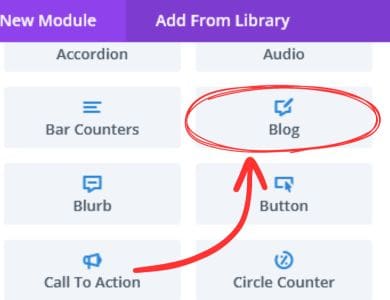
Click on the + to add a Module in the Divi Builder and select the Blog Module
Once you have added it, I find it works best when you set the layout to grid. You can do so by going to Design -> Layout and then change the dropdown to Grid.
All good so far?
Ok. Let's move on to the next step.
Step 2 - Disable the Pagination
Pagination is the links that you would usually press to scroll through more than one page of blog post results. However, in this case we want to load more posts under our existing blog post results.
So it would make sense to disable these links.
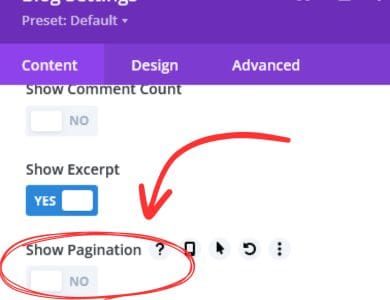
You can easily do so in the Divi Blog Module settings. Under Content -> Elements set the Show Pagination to No.
Once that is done, we are ready to move on to the next step.
Step 3 - Add the CSS Class Name
In order for the button to recognise the Blog Module, we will need to add a custom CSS class to it. This will ensure that the when the button is clicked it will only affect this module and not the rest of your site.
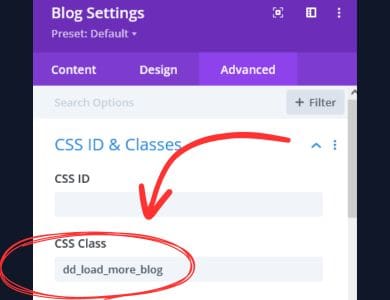
Open up the Blog Module settings and head to the Advanced tab where you should see the CSS IS & Classes option.
Click it to open it and then under CSS Class add in "dd_load_more_blog" as shown below
Still with me? Great! Let's move to step 4.
Step 4 - Add the Button and CSS ID
This step is more of a two part action but since you are now familiar with the settings, I am confident this will be a breeze for you.
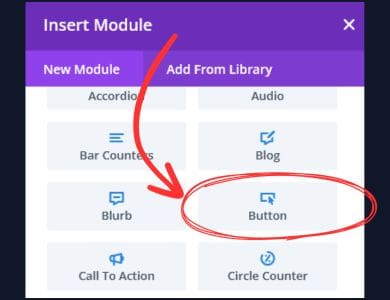
Add a Button Module Directly Below the Blog Module
To keep things simple, we are going to add a button module as the load more button. Please be sure to add this directly below the Blog Module.
Once the button is added, you can style it as you wish using the Design settings of the button. A good rule of thumb is to make sure you set your Alignment to Centered.
Once you are happy with your design, we will need to add in a CSS ID for your button.
Head over to your Button settings and go to the Advanced tab. Click on the CSS ID & Classes just as you did with the Blog Module but this time we are going to add in an ID not a Class. So feel free to copy and paste the following "dd_load_more_btn" into your CSS ID field as per the screenshot below.

And with that, all our ground work has been done. Now we have to add some code to make the magic happen. Let's take care of that in Step 5.
Step 5 - Add the JQuery Snippet
So this is likely the only real tricky part. No need to worry though as if you have followed the previous steps correctly this should be no issue.
Copy the following code
<script>
jQuery(document).ready(function(){
//For mobile Screens
if (window.matchMedia('(max-width: 767px)').matches) {
var initial_show_article = 3;
var article_reveal = 3;
jQuery(".dd_load_more_blog article").not( ":nth-child(-n+"+initial_show_article+")" ).css("display","none");
jQuery("#dd_load_more_btn").on("click", function(event){
event.preventDefault();
initial_show_article = initial_show_article + article_reveal;
jQuery(".dd_load_more_blog article").css("display","block");
jQuery(".dd_load_more_blog article").not( ":nth-child(-n+"+initial_show_article+")" ).css("display","none");
var articles_num = jQuery(".dd_load_more_blog article").not('[style*="display: block"]').length
if(articles_num == 0){
jQuery(this).css("display","none");
}
})
} else {
//For desktop Screens
var initial_row_show = 1;
var row_reveal = 1;
var total_articles = jQuery(".dd_load_more_blog article").length;
jQuery(".dd_load_more_blog article").not( ":nth-child(-n+"+initial_row_show+")" ).css("display","none");
jQuery("#dd_load_more_btn").on("click", function(event){
event.preventDefault();
initial_row_show = initial_row_show + row_reveal;
jQuery(".dd_load_more_blog article").css("display","block");
jQuery(".dd_load_more_blog article").not( ":nth-child(-n+"+initial_row_show+")" ).css("display","none");
var articles_num = jQuery(".dd_load_more_blog article").not('[style*="display: block"]').length
if(articles_num == 0){
jQuery(this).css("display","none");
}
})
}
})
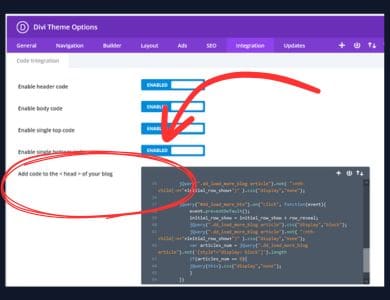
</script>and then header over to your Divi Theme Options -> Integrations and paste this into the Head field as per below
Make sure to save all changes and that should do it!
If you go to your blog module page now and view the live version, it should show three posts and when you click the button it will display another three for you.
The reason for this is if you look at the code, there are four values I would like to draw your attention to
- initial_show_article
- article_reveal
- initial_row_show
- row_reveal
The first two are for mobile screens and the last two are for desktop screens.
If you change the numbers of the first two, it will affect how many articles are shown when viewed on mobile and when the button is clicked it will display as many articles as it listed in the article_reveal value.
Similarly on desktop, it will initially show you the amount of rows as set in the initial_row_show and when the button is clicked it subsequently open more rows as dictated by the row_reveal value.
Wrapping Up
And that is all there is to it. Simple right?
Hopefully you found that useful and it worked first time for you. If it did not, always make sure you placed the correct values in the CSS Class and CSS ID fields as that usually is the only step that trips people up.
May it serve you well!
